1-10V
1-10V dimmers are a convenient way to control the brightness of your LED lighting. This system works with a low-voltage signal (between 1 and 10 volts) for stable dimming. The higher the voltage, the brighter the light: at 10V the lamps are at full power, at 1V they’re at the lowest level (often around 10%). At 0V, the lighting usually switches completely off.
Understanding How 1-10V Dimming Works
1-10V dimming is an analog control method. This means the light output is directly regulated by a variable voltage. A 1-10V dimmer sends a low-voltage signal to a compatible LED driver. The driver converts the signal into the required current for the LEDs, thereby adjusting the brightness of the light.
Unlike phase-cut dimmers, which are installed directly in the 230V electrical circuit, 1-10V dimming requires a separate control wire between the dimmer and the LED driver. This system is robust and widely used wherever a simple and efficient dimming method is preferred.
Applications for 1-10V Dimmers
1-10V dimmers are used wherever precise light control is needed. Typical applications include:
- Office buildings: For optimal adjustment of light levels in meeting rooms or open-plan offices.
- Industrial and warehouse halls: Dimmable lighting helps save energy and creates a tailored working environment.
- Retail stores and showrooms: For optimal display and ambiance thanks to flexible lighting.
- Schools and educational institutions: Adjustable lighting in classrooms, for example during presentations or various activities.
- Large spaces with many fixtures: The 1-10V system's scalability makes it suitable for centrally controlling multiple lighting points.
Advantages of 1-10V Dimming
Choosing 1-10V dimming technology provides specific advantages, especially for professional and larger installations:
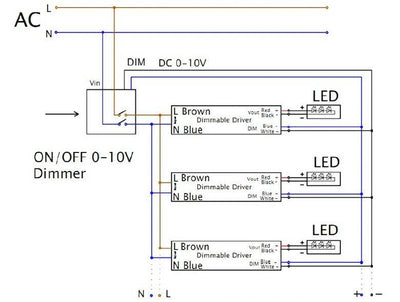
- Scalability: Multiple LED drivers can be connected to a single 1-10V dimmer, as long as the maximum current rating isn't exceeded. Ideal for large groups of fixtures.
- Stable dimming curve: 1-10V dimmers usually provide flicker-free and even dimming.
- Cost efficiency: The hardware for 1-10V systems is often less expensive than more complex digital solutions (like DALI), especially for large projects.
- Simple wiring: An extra control cable is needed, but overall wiring is generally straightforward.
- Wide range of fixtures: Many professional LED fixtures and drivers support 1-10V dimming—offering a broad product selection.
1-10V vs. DALI Dimming: A Comparison
Although 1-10V dimming is effective, it's interesting to compare it to the popular DALI system (Digital Addressable Lighting Interface):
| Feature | 1-10V Dimming | DALI Dimming |
|---|---|---|
| Signal type | Analog | Digital |
| Wiring | Separate control cable required (2-core) | Two-wire, no polarity |
| Control | Group control of fixtures | Individual addressing of fixtures |
| Functions | Dimming only (On/Off/Brightness) | Dimming, scenes, error messages, color temperature control (tunable white), building automation |
| Complexity | Easier to implement | More complex, requires programmable controller |
| Scalability | Number of drivers depends on dimmer current | Up to 64 addresses per DALI line |
| Cost | Usually lower | Usually higher, especially in small installations |
Installation and Connection of 1-10V Dimmers
Installing a 1-10V dimmer involves correctly wiring the 230V power supply and the 1-10V control line. Always follow the manufacturer’s instructions, as these can vary by product.
Installation steps:
- Turn off the power: Safety first. Make sure the power is completely off before you start.
- Connect the 230V power supply: Connect phase and neutral wires to the corresponding inputs of the 1-10V dimmer.
- Connect the 1-10V control line: These two thin wires (+ and - or 'Dim'/'Dim-') connect the dimmer to the 1-10V input on the LED driver. Mind the polarity if indicated.
- Connect the 230V output to the driver: The switched 230V output from the dimmer goes to the 230V input on the LED driver.
- Check all connections: Inspect all wiring for a correct and safe installation.
- Turn the power on and test: Power the circuit and test the dimmer.
For complex installations or if you are unsure about the wiring, we recommend hiring a professional electrician.
Frequently Asked Questions About 1-10V Dimmers
Does every LED lamp work with a 1-10V dimmer?
No, only LED lamps or fixtures with compatible 1-10V dimmable LED drivers can be controlled with 1-10V. This information can be found on the product page or in the driver specifications.
Is a separate power cable needed for 1-10V dimming?
Yes, in addition to the 230V supply, a separate control cable is needed to carry the 1-10V signal from the dimmer to the LED driver (usually two-core).
What happens if the 1-10V signal is lost?
If the 1-10V signal is lost or drops below 1V, most drivers will switch off the lighting or dim to the lowest level.
Can I combine a 1-10V dimmer with other dimming systems?
No, a 1-10V dimmer is designed solely for 1-10V dimmable drivers and cannot be directly combined with other dimming methods such as phase-cut, PWM or DALI, without an appropriate converter.
Why choose 1-10V dimmers?
1-10V dimmers are a reliable, efficient solution for centrally dimming large groups of LEDs. They offer uniform, affordable dimming and are ideal for professional applications and projects.
